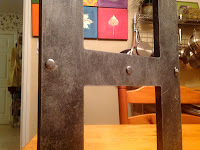
Industrial Vintage "HOME" Letters
So I'm trying to write a little quicker about some of things I'm working on. I am currently making 80+ cream colored rosettes for my antique platform rocker which I have lovingly started calling the "Wedding Rocker" since that's what it's beginning to remind me of with all these stinking flowers I've been burning my fingers off with making. I just love glue guns.... don't you?
I did manage to finish a set of "HOME" Industrial Vintage-looking letters today.
Started them yesterday.... should have started them a few weeks ago when I got them. I picked them up at a thrift store in Montgomery, Alabama for so freaking cheap it was almost like stealing them.
When the lady at the register decided to give me an extra 20% discount on top of the price, I knew someone had handcuffs ready to slap on me for absolutely-positively stealing them!
Each letter measures 1/2" thick, 16" high, and anywhere from 9-13" wide. They are made of a heavy-duty plastic which was originally a high gloss black before I got to them. They are very durable, so I was very excited to get my hands on those puppies!
I used a grey, metallic "Hammered" spray paint from Rust-Oleum and "Martha Stewarts" Metallic Paint in Silver, which I have been dabbling with lately and must say that I love what it does when it comes to needing a metallic finish on a piece. The stuff is a lot like Annie Sloan Chalk Paint in that a little goes a long way. It comes in copper, gold, brass, and silver. There are also metallic finishes that go with the paint that you can mix with antiquing glaze that has some amazing affects as well. I'm working on a "Steampunk" frame using copper and gold as well.
After I primed each piece with one coat of the "Hammered" spray, I dry-brushed the silver metallic on. When you dry-brush, you put very little paint on the end of your brush and then wipe it all off on a paper or cloth towel. You want to work in small areas so that you have more control of how industrial your piece is going to look. I stippled lightly on an area at first and then I - even more lightly - swished the brush back and forth diagonally in one direction, and then in the opposite direction. If you do really fast and light, you will create "scratch" marks that resemble old scratched metal. This is the look you're after.
After that finished, I had some leftover vintage upholstery nails that I took a Roto-Zip to and cut off the points. I used the old upholstery nails because it saved money not having to buy them since I had them sitting around after removing them from a couple of old wooden lard barrels that were given to me recently to "do something" with. I'm still thinking about them.
The Roto-Zip comes with this handy little metal sanding disc for jobs just like this. The only problem was holding onto the nail and not filing my skin off in the process. But I fixed that by holding the upholstery nail down on a sheet of wood with a small flat head screwdriver and carefully sanded the nail part off. Don't forget the to protect your eyes when doing this because that nail point will fly once it comes off. Next you just sand the rest of the point down below the head of the upholstery nail.
I couldn't nail the upholstery nails in to the plastic (as my kids suggested), because of the risk of cracking the hard plastic the letters were made. Taking no chances here. I hot glued the nail heads onto the painted surface and then dry-brushed a little more silver metallic paint onto their surface.
What I had created was a perfect set of faux industrial vintage letters that are going to look smashing in my booth next week!
Jusqu'à la prochaine fois!
Vintage Resurrections


girl,no comments? these are amazing....since I have been looking at all the amazing...you have done.I mean I am serious you are amazin...I have my comments going to my email now...so I can respond....and say thank you so I hope you will see all my comments, telling you wow.....people are missing out on your creations.
ReplyDeleteCan I say one little thing,your no spam,robot checker is one of the hardest I have seen....