Transforming and Repairing a MDF Dresser
Once again, I broke my rule of not working on MDF (fiberboard), furniture. In this case, I really didn't know it until it showed up on my doorstep ready to be worked on.
Mental Note: "ASK before accepting."
When it showed up, I was more inclined to suggest they toss it in the garbage instead. What a wreck it was! The backing was missing entirely and it wobbled back and forth so bad that I was sure the sides were going to crack before we got it into the house!
Everything was wrong with this piece, but being the softie I am about unwanted pieces - I took her on anyway. I started by putting on a new plywood backing and securely screwing it in. In this case, I made sure to add a few drops of wood glue to each screw so they wouldn't "wiggle" out over time - which MDF wood is notoriously known to cause!
If it didn't work, I was throwing it out and calling it a total loss for my client.
Luckily for both of us, it made the piece solid again. No more wobbling around, or leaning back and forth anymore. She was ready to be transformed!
After priming her, she was painted a couple of coats of Old White:
Then she was given a light coat of tea stain.
Then I added these awesome rose knobs to the top drawers since this was going to be a nursery dresser for my clients soon-to-be-born daughter!
So the dresser that was once a very serious candidate for the the local dumpster ended up looking like this when I was done:
This should actually be the part where I say "The End", and go on to my next piece waiting behind me.
But it isn't - it's just the beginning.
I actually did several pieces for this client which included a tall dresser, a queen size bed, and a TV cabinet. Her and her husband got them all home and were rearranging stuff here and there. You know, that nesting thing we all women do before a baby is born.
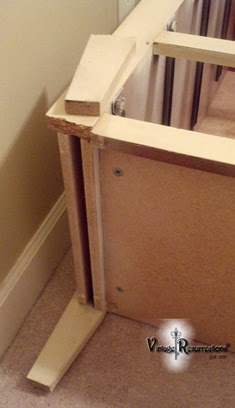
They were fixing up the nursery when this happened:
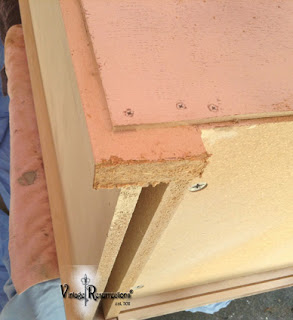
Because MDF made wood lacks integrity and durability in so many departments that I can't name them all, the front left leg broke off while they were moving it from one part of the room to another.
Of course I said, "No problem! I can fix it!"
Until it arrived back in my arms a week later, I spent much of my waking time going over and over and over, in my head, how I was going to do this.
This is the better part of my OCD kicking in.
Once I found the legs my client picked, it was just a matter of rebuilding the bottom of the dresser in order for it to support the new legs.
First I had to saw off the old legs still on the piece. This took some clever imagination and a most incredible sales guy at Home Depot to see my vision with me. Since the piece was too bulky to use a table saw/miter saw situation, I need a small wood saw for my hand drill because I do NOT want to buy a special tool for this job!
Several sales people later - and I do mean several - this 20-something guy got that SAME look in his eye that I do when I come up with a crazy idea like this. Suddenly he was rushing up and down the aisle and helping me to look for the exact same saw blade that I/we were seeing in our heads. Then like a gift from the heavens, he presented me with an attachment that would work with combining the saw blade with my hand drill.
I really wished I could have kissed him, but there was a rather uncomfortable age difference between us.
Not going there.... no way.
Now I've got my handy-dandy saw tool (insert Tim Allen "Home Improvement" grunt here), and I've marked where I need to cut these suckers off once and for all.
It was a slow and steady process, but my hand drill saw is doing exactly what I had envisioned doing for a week.
They came off clean!
Now came a tedious process of rebuilding the bottom. This meant mounting 3/4 inch plywood as the foundation, over a set of three 1x2" support beams glued to the dresser itself. My goal was to give added support to crappy wood, which it meant building under and around that crappy so-called "wood".
Next I needed to add wood moulding around the bottom edges to hide the rebuilt part once I put the legs on.
Once that was done, holes were drilled for the legs and the metal table leg mounts are screwed on.
You can see where I have added extra support around the bottom edges of the moulding. Even though the moulding was glued and nailed in, I'm not taking chances with the MDF weakening in an area and causing the whole thing to fall apart again.
The wood supports are also staggered to make room for the "fat" table legs, which are nearly 5 1/2" wide.
Don't they look like four little fat men sitting in a row!
This set up also made it easier to paint the legs. I just drilled a hole in a piece of 1" wood and screwed the legs in. I just turned them with my palm when I needed to paint or stain another part!
Now that the moulding and the legs are painted and stained, it's time to screw the legs in and see if this worked.
YES!
(The client left the drawers at home this time around since I didn't need them,
so that is why it is Sans Drawers in the final picture)
So here is the bottom before:
Now the bottom after:
Yeah! It worked!
Even though I enjoyed repairing and transforming these drawers, between my "Bird in the Tree" drawers, and this......
I am ne-VER working on MDF again!
Linking in with:


Comments
Post a Comment