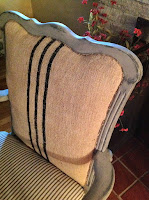
Pin-Striped, Grain Sack Chair
I recently finished, and then sold, a chair that I found at a local thrift store in the area. It seems people want to get rid of perfectly good chairs for cheap around here.
I win!
It was originally painted what looked like plastic blue which made the whole chair look "Blue Light Special" cheap. I don't even know if the plastic ribbed vinyl cover on the cushion and chair back is even worth mentioning.
Getting a good ugly picture of it yet? If not, then here you go!
See what I mean?
But at least the chair was all wood which is a big thing with me. I SO hate MDF! I am an admitted snob in this department.
I first detached the cushion which was in great shape and needed little to no work on it. Then I got into the business of painting a coat of ASCP in Graphite, followed by a coat in Paris Grey.
After distressing with a steel wool pad, I followed it up with adding hints
of a metallic chrome paint on the the arm. Also, instead of waxing this piece, I used a flat varnish (2 coats), instead. I wanted a very flat look to this, so no stain or wax was used.
A little more distressing and then it was onto the "hard" part....... the cushion.
I speak in all jest when I say that about the cushion. I never realized reupholstering furniture was so darn easy until I tried it last year. Once you kick your fear about it to the curb, it's really quite easy. This type of cushion recovering is easiest of all. Since the cushion itself was in great condition, all I had to do was re-stuff, re-cover and then reupholster with the pin-striped French ticking.
It took about 1/2 hour to turn the cushion into this:
I love a good electric staple gun during a project like this!
All that was left to do was finish reupholstering the back of the chair.
Enter another French antique grain sack I have in my stash - this one with a black stripe down the middle. This one is a linen sack an not the jute type I used on my other grain sack chair. I needed a softer touch to go with the French ticking fabric. The backing went on first and I stapled that in. Then the it was filled with a cotton batting to create the cushion back, then the the backing front was hot glued in.
After the front backing was attached, I had to stand back and stare at it for awhile.
"To braid, or not to braid.... THAT is the question!"
Believe it or not, I decided not to braid the edges of the front and it turned out charming.
It didn't last long as it sold the first week I had it in my booth at Angel's Antiques.
Adieu mon amour!
Vintage Resurrections


I am in love with this chair! I just bought a set that I want to do this too...thanks for the inspiration!
ReplyDeletelove this chair.....and great work
ReplyDelete